In short: This no code bot builder allows Botster users to create their own custom bots that can:
- Extract data from web pages
- Monitor web content changes and receive updates
- Extract structured data from catalogs (e-commerce or directories)
Before starting, you will be required to install Botster’s official Chrome extension.
Please select which type of bot you are interested in building:
- Single page scraper - perfect for extracting data from product pages.
Click to view the example results for a better idea of what the bot does.
More examples:
- How to export Airbnb data
- How to extract Zillow agent data
- How to export Github users
- Web monitoring bot - ideal for monitoring page content changes (prices, web elements, SEO).
Click to view the example results for a better idea of what the bot does.
More examples:
- How to monitor stock market data
- List scraper - ideal for scraping catalogs and lists of data from paginated websites.
Click to view the example results for a better idea of what the bot can export.
More examples:
How to build your bot
Single page scraper
In short: This customizable bot constructor allows you to extract data from various elements on your target web pages.
Click to view the example results for a better idea of what the bot does.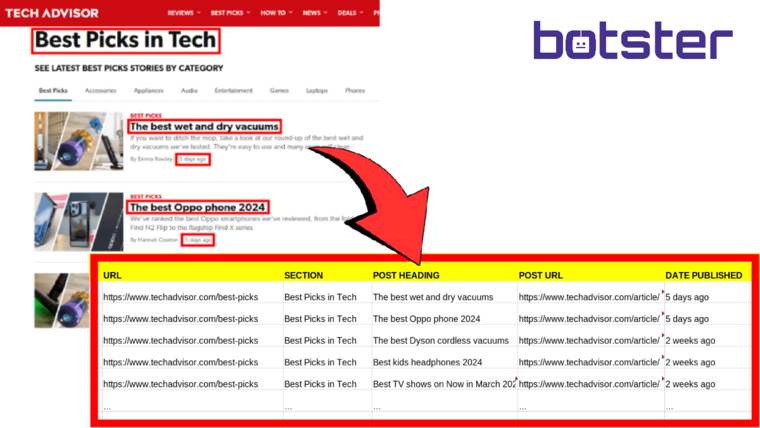
How to use the bot constructor: Video tutorial
Watch a quick video guide on how to launch the single page scraper:
Software walkthrough
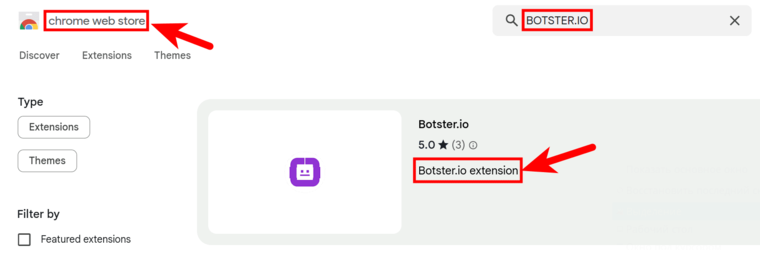
1. Install the free Botster.io extension
To get access to Botster’s bot builder platform, go to the Chrome Web Store and install the free Botster.io extension:
 2. Open the bot creation form.
Click on the "Create bot" button on the right-hand side of this page:

3. Select the bot type.
Available bot builders include:
- Single-page scraper
- Monitoring bot
- List scraper
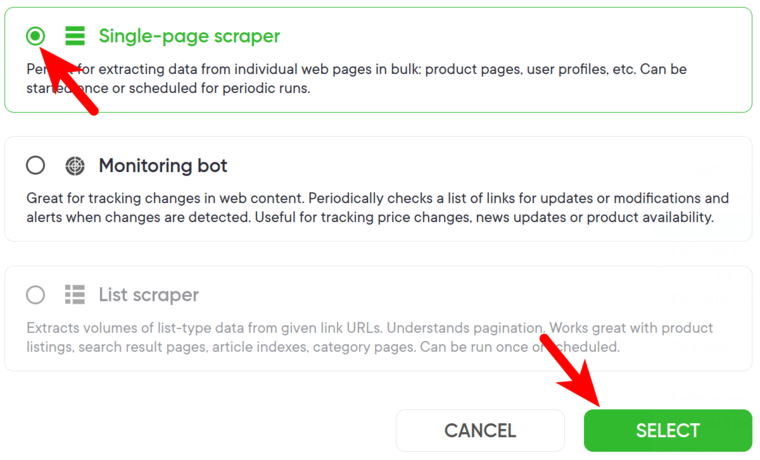
To extract data for a single use, tick “Single-page scraper” and click on the green “Select” button:
4. Enter the details.
Give your "Job" a meaningful title, and optionally specify (or create) a project folder:

5. Enter a website link.

6. Click on “Select elements”.

A pop-up window will appear. To be able to use the auto bot builder, you need to give it access to the incognito mode. Open your Chrome settings:
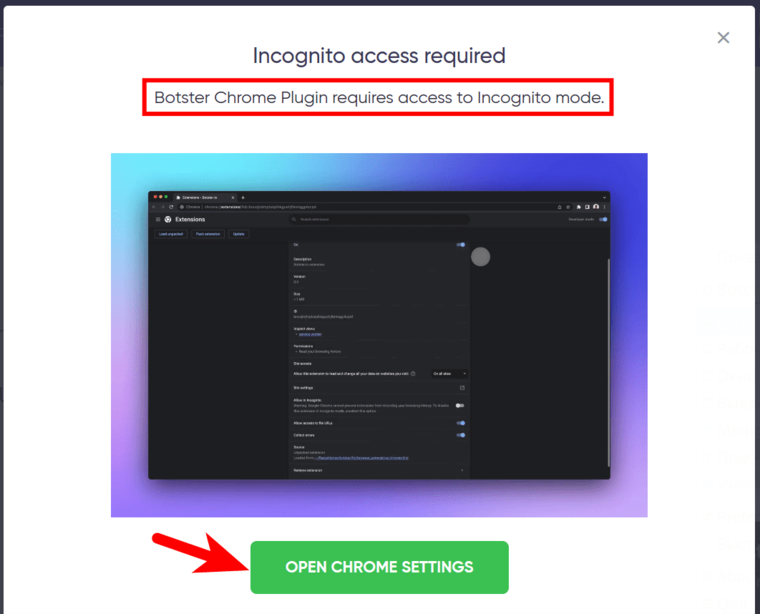
Turn on “Allow in Incognito”:

7. Go back to the bots builder page and click on “Select elements” once again:

8. Add elements.
Your target website will open, and the element picker will appear. Click on “Add element”:
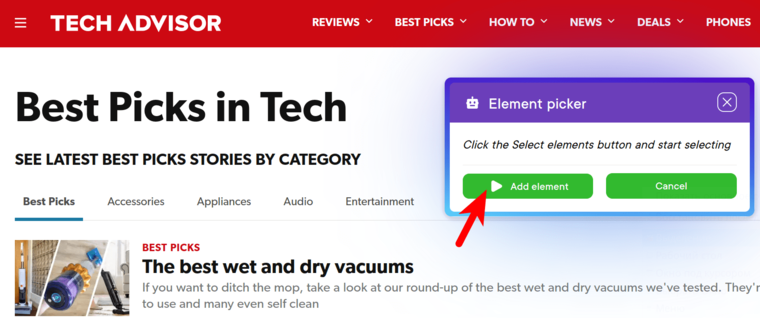
Select the element you need to extract:

Once you’ve selected the desired element, click on “Stop”:
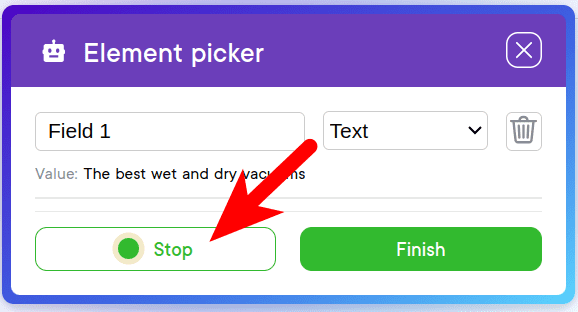
Repeat the same steps to select all the elements you need to extract.
Once you’ve added all the desired elements, click on “Finish”:
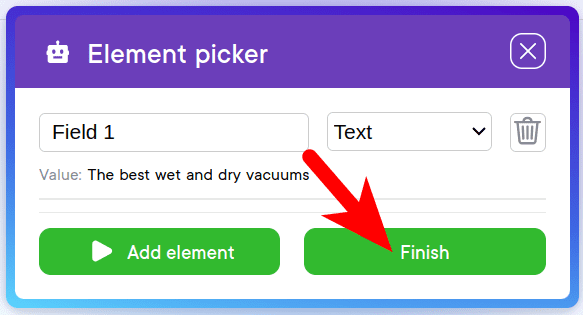
Wait for the page to close automatically.
Your selected fields will appear on the visual bot builder page:
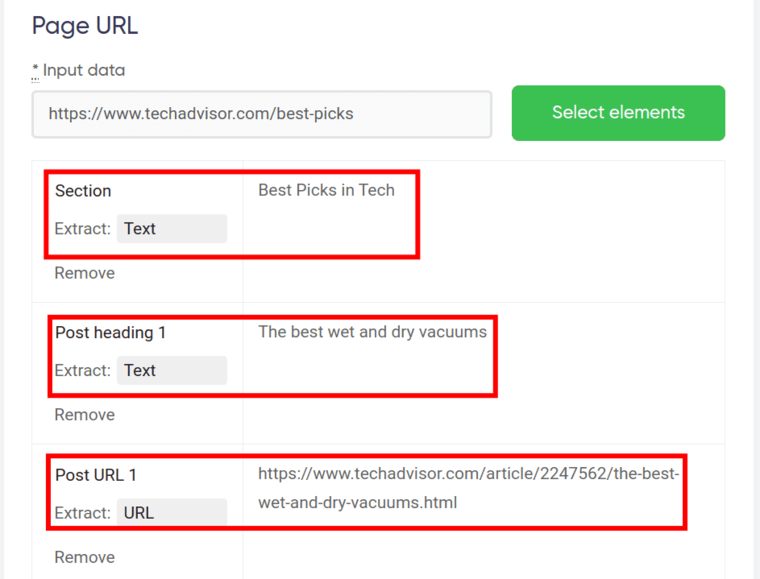
9. Add more URLs (optional).
If you have multiple URLs having an identical structure, you can export the same fields from all of them in one go. Enter these URLs into the field below.
⚠️ All URLs you are entering must have an identical element structure.
⚠️ Each URL must go on a new line:

10. Set up notifications.
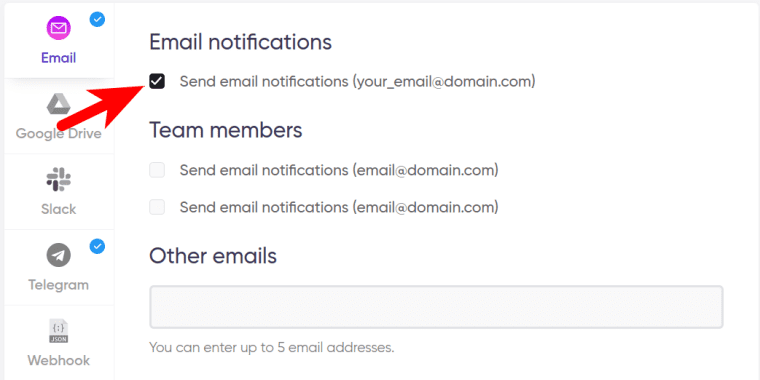
Specify if you would like to receive a notification when the no code bot builder completes the crawl:
11. Start the bot!
Click the "Start this bot" button on the right-hand side:

That's it! You will be taken to your "Jobs" section. Your customizable bot is now working and will notify you once it's done.
Data output
After the bot constructor completes the job you can download your data as an Excel (XLSX), CSV or JSON file.
Monitoring bot
In short: This easy bot builder allows you to monitor web content changes and receive updates. Perfect for monitoring prices.
Click to view the example results for a better idea of what the bot does.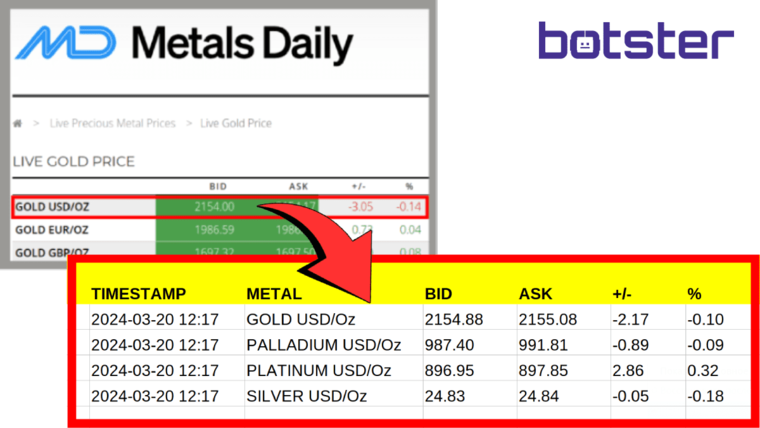
How to use the customizable monitoring bot: Video tutorial
Watch a quick video guide on how to launch the monitoring bot:
Software walkthrough
1. Install the free Botster.io extension
To get access to Botster’s AI bot builder platform, go to the Chrome Web Store and install the free Botster.io extension:
 2. Open the bot creation form.
Click on the "Create bot" button on the right-hand side of this page:

3. Select the bot type.
Available bot builders include:
- Single-page scraper
- Monitoring bot
- List scraper
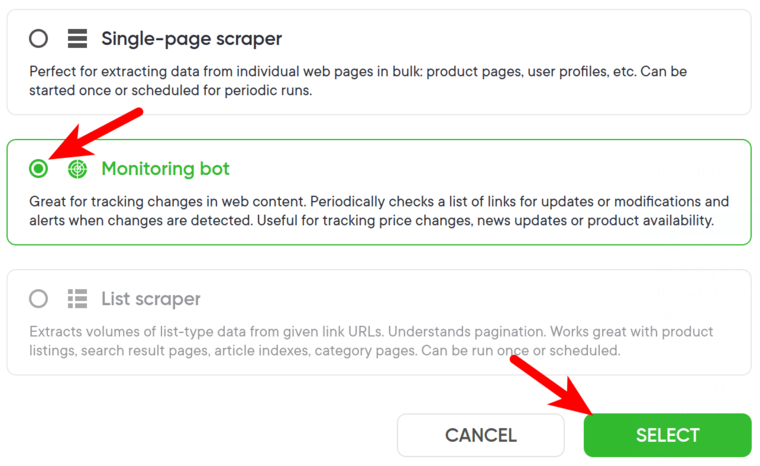
To extract data on a regular basis, e.g. for monitoring purposes, tick “Monitoring bot” and click on the green “Select” button:
4. Enter the details.
Give your "Job" a meaningful title, and optionally specify (or create) a project folder:

5. Enter a website link.

6. Click on “Select elements”.

A pop-up window will appear. To be able to use the auto bot builder, you need to give it access to the incognito mode. Open your Chrome settings:

Turn on “Allow in Incognito”:

7. Go back to the bots builder page and click on “Select elements” once again:

8. Add elements.
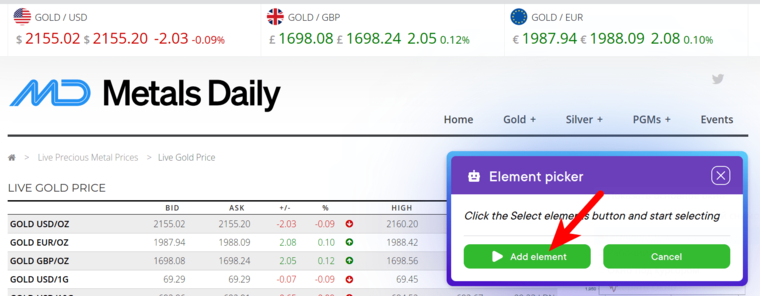
Your target website will open, and the element picker will appear. Click on “Add element”:
Select the element you need to extract and monitor:
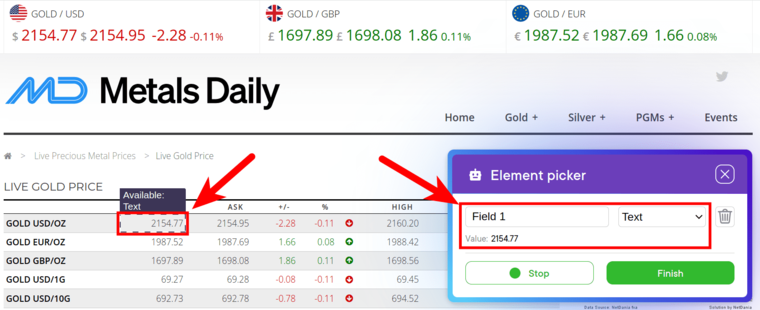
Once you’ve selected the desired element, click on “Stop”:
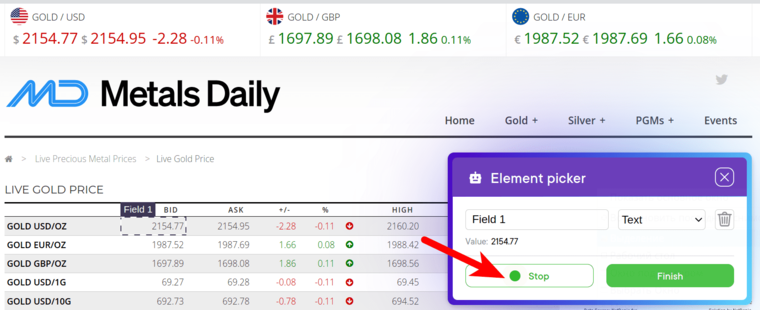
Repeat the same steps to select all the elements you need to extract.
Once you’ve added all the desired elements, click on “Finish”:
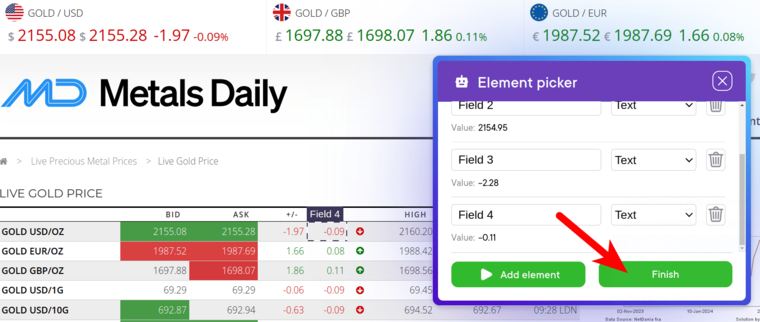
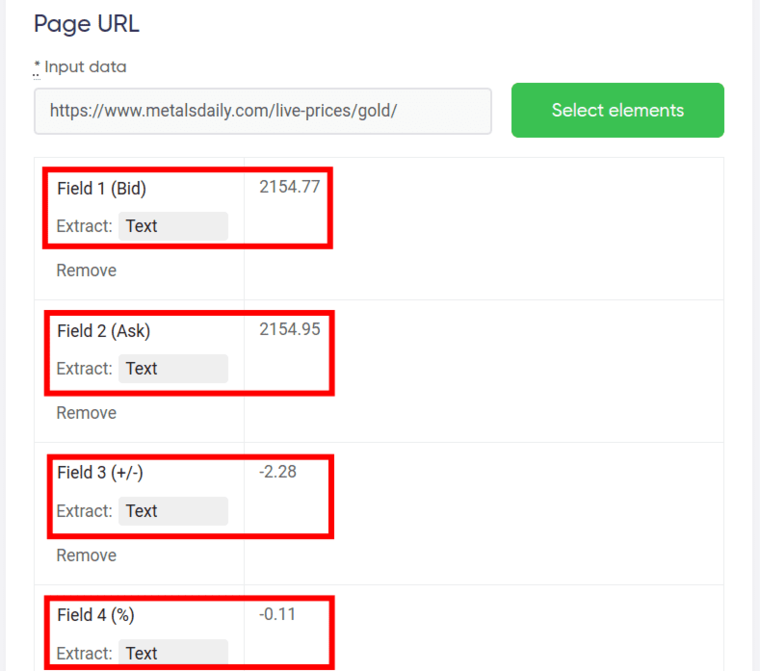
Wait for the page to close automatically.
Your selected fields will appear on the visual bot builder page:
9. Add more URLs (optional).
If you have multiple URLs having an identical structure, you can export and monitor the same fields from all of them in one go. Enter these URLs into the field below.
⚠️ All URLs you are entering must have an identical element structure.
⚠️ Each URL must go on a new line:

10. Enable screenshot making (optional).
The monitoring bot creator software can take screenshots of each URL on every visit. The screenshots will be displayed on the monitoring log dashboard. When enabled, extraction time per URL increases.

11. Select the target country.

12. Set monitoring frequency.
You can set the monitoring AI bot creator to run:
- Every 30 minutes
- Every hour
- Every day
- Twice a day
- Once per week
- Twice a week
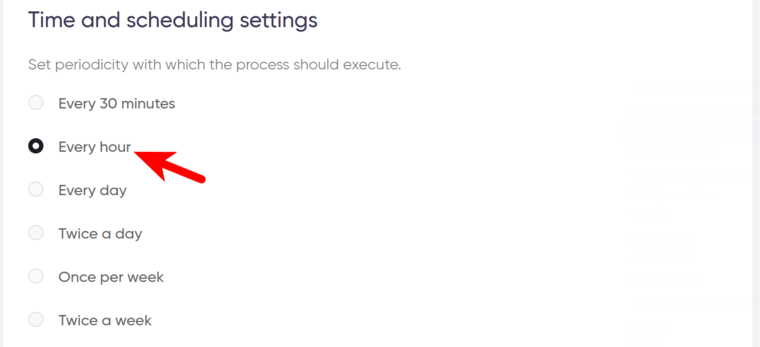
If no longer needed, the job can be stopped either manually or at a certain date specified in advance:

13. Set up notification conditions.
Select if you’d like this easy bot builder to send you notifications if no changes have been detected:

14. Set up notifications.
Specify if you would like to receive a notification when the no code bot builder completes the crawl:

15. Start the bot!
Click the "Start this bot" button on the right-hand side:

That's it! You will be taken to your "Jobs" section. Your customizable bot is now working and will send you notifications according to the pre-set schedule.
Data output
After the bot constructor completes the job you can download your data as an Excel (XLSX), CSV or JSON file.
List scraper
In short: This customizable bot constructor allows you to extract catalogs and data lists from paginated websites. Perfect for scraping products from online stores.
Click to view the example results for a better idea of what the bot can export.
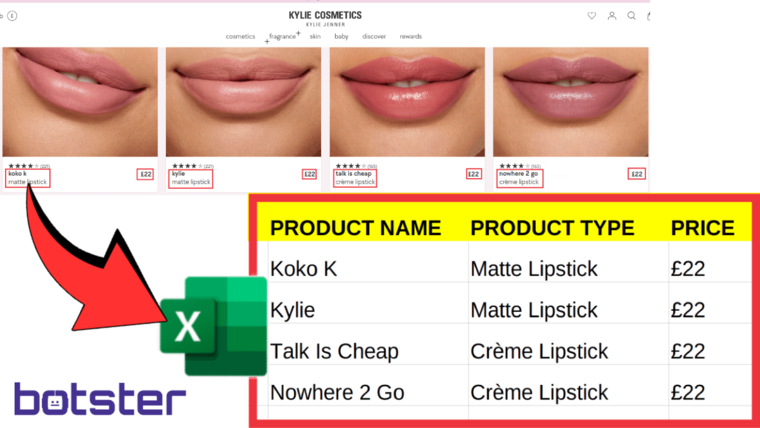
How to use the bot constructor for scraping catalogs and lists of data: Video tutorial
Watch a quick video guide on how to launch this tool:
Software walkthrough
1. Install the free Botster.io extension
To get access to Botster’s bot builder platform, go to the Chrome Web Store and install the free Botster.io extension:

2. Open the bot creation form.
Click on the "Create bot" button on the right-hand side of this page:

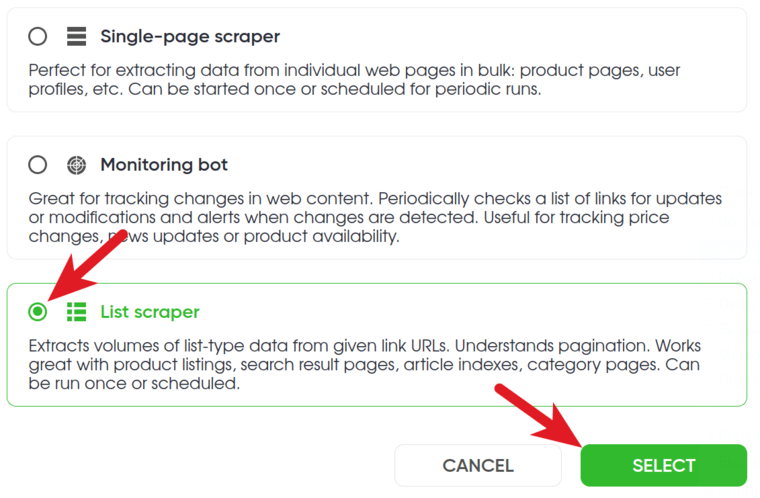
3. Select the bot type.
Available bot builders include:
- Single-page scraper
- Monitoring bot
- List scraper
To extract lists or catalogs from paginated websites, tick “List scraper” and click on the green “Select” button:
4. Enter the details.
Give your "Job" a meaningful title, and optionally specify (or create) a project folder:

5. Enter a website link.

6. Click on “Select elements”.

A pop-up window will appear:

To be able to use the auto bot builder, you need to give it access to the incognito mode. Open your Chrome settings and turn on “Allow in Incognito”:

7. Go back to the bots builder page and click on “Select elements” once again:

8. Add elements.
Your target website will open, and the element picker will appear. Click on “Let’s start”:
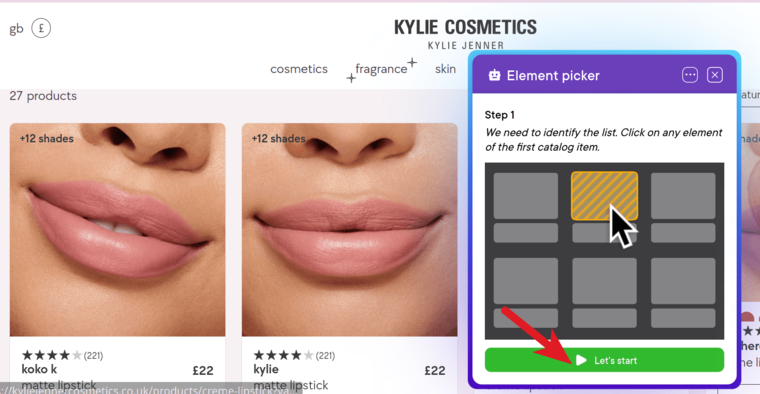
Click on any element of the first catalog item to help the bot find the list:
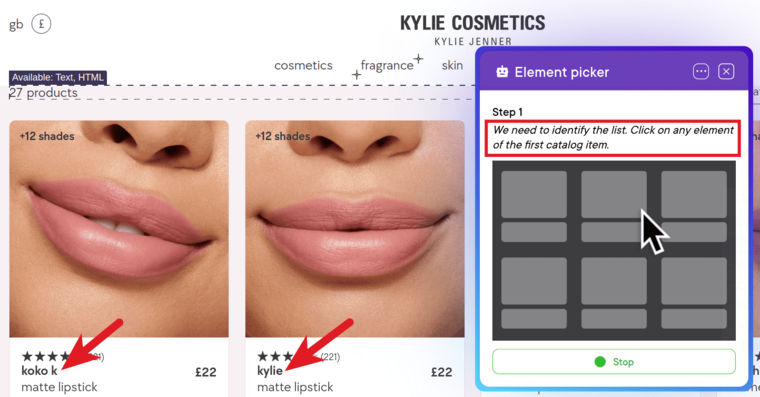
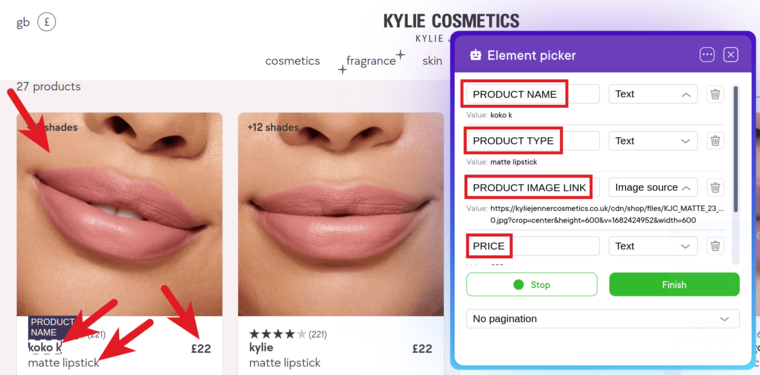
Now the bot has identified the list. Click on the elements that you need to export. For example, product name, product type, image link, price, etc.:
9. Select pagination type.
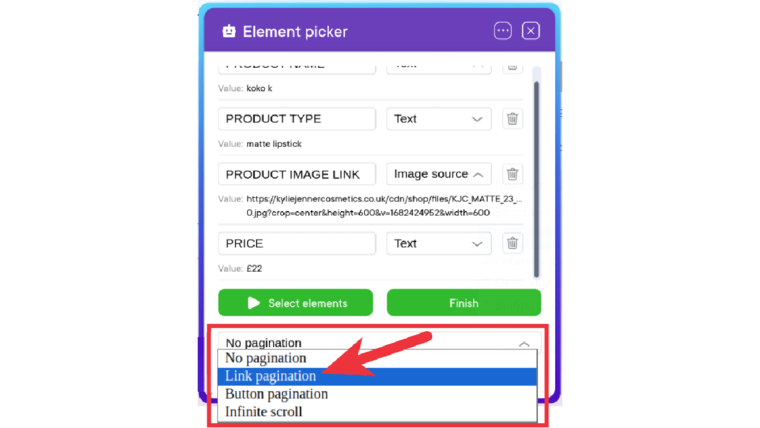
If the site has built-in pagination, the bot can scrape data from multiple pages. Available options include:
a) No pagination
b) Link pagination
c) Button pagination
d) Infinite scroll
a) No pagination
Select this option if the site has no pagination at all or if all the data you need to scrape is located within the first page.
b) Link pagination
Select this option if pagination is implemented in the form of a link.
Select “Link pagination” in the dropdown menu:
Click on “Link page”:
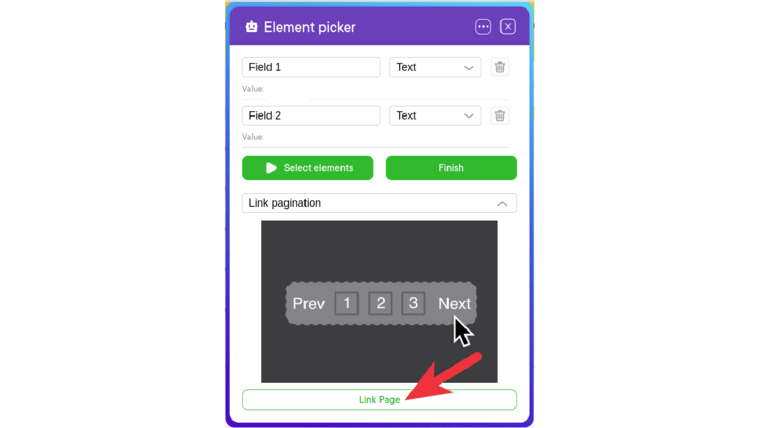
Select the link that redirects you to the next site page.
c) Button pagination
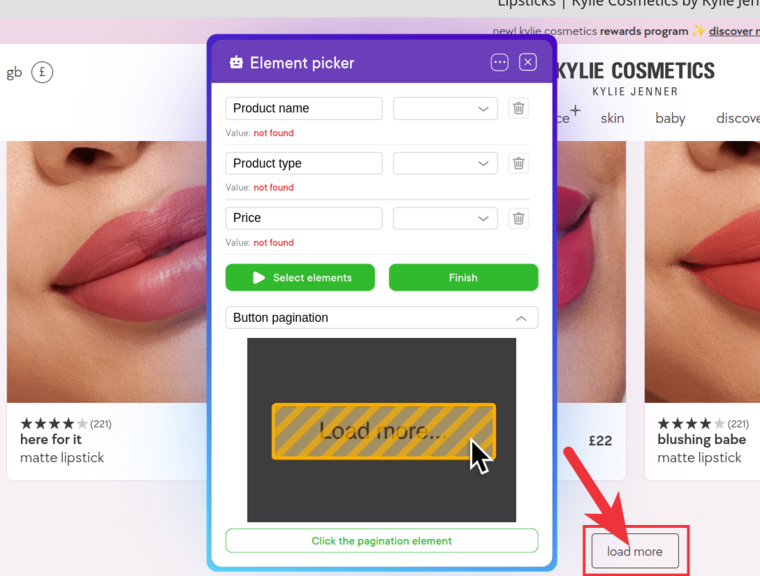
Select this option if pagination is implemented in the form of a button (e.g. “Load more”, “View more”, etc.).
Select “Button pagination” in the dropdown menu:
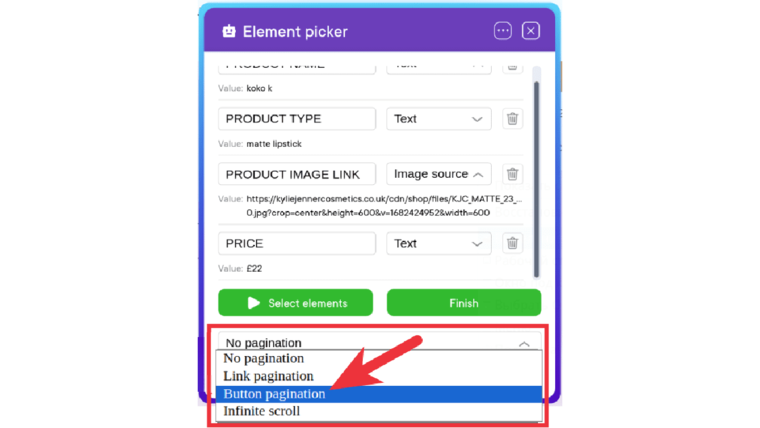
Click on “Select pagination link”:
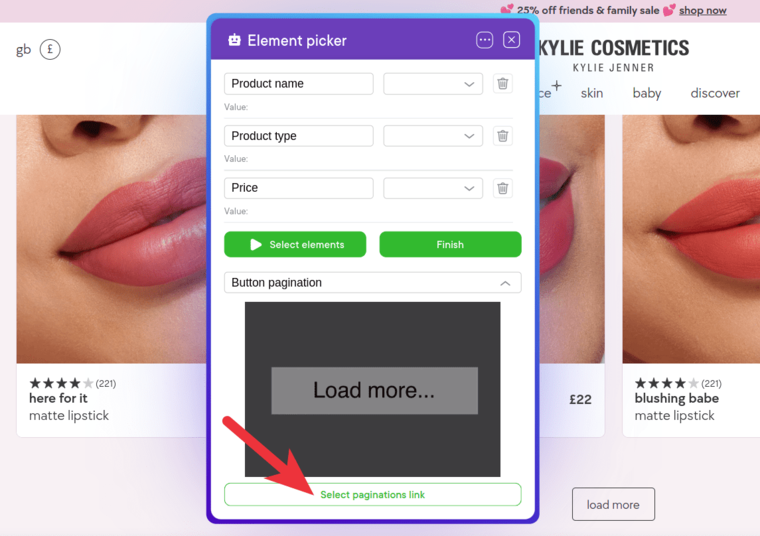
Select the pagination button:
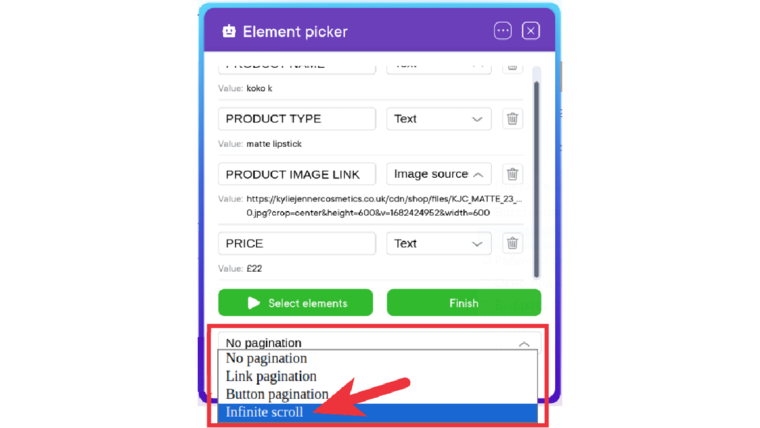
d) Infinite scroll
Select this option if pagination is implemented in the form of an infinite scroll.
Once you’ve added all the desired elements and selected the pagination type, click on "Stop" and then on “Finish”:
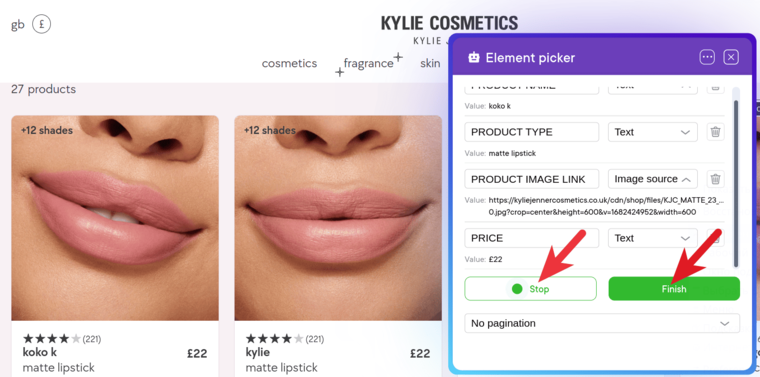
Wait for the page to close automatically.
Your selected fields will appear on the visual bot builder page:
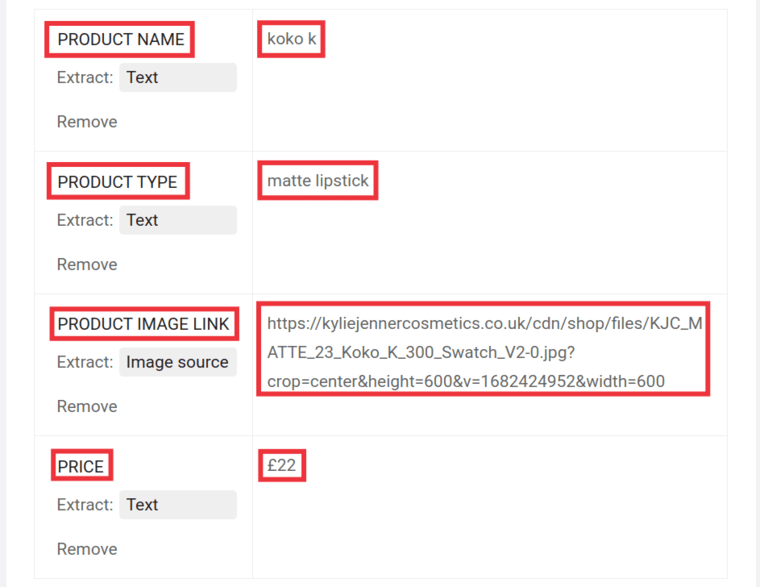
10. Set the number of product items to extract (up to 1000).

11. Set the Proxy location.
It is recommended to opt for the United States.

12. Specify if you’d like to use AdBlock (recommended).

13. Specify time settings.
Tick the checkbox if you want the bot creator software to scrape data from your target site on a regular basis:

Once you’ve ticked the checkbox, the available options will appear. You can set the customizable bot to run:
- Every hour
- Every day
- Twice a day
- Once per week
- Twice a week
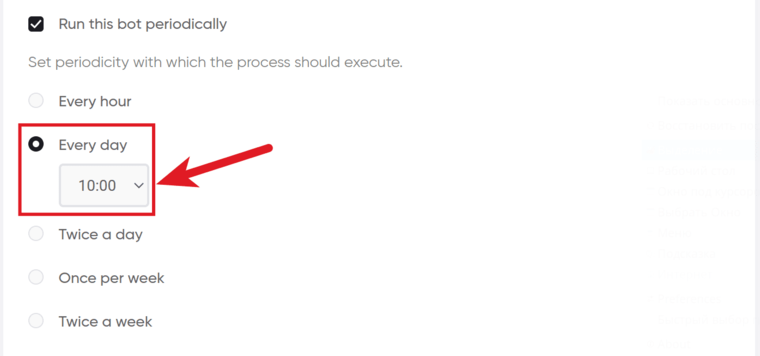
If no longer needed, the job can be stopped either manually or at a certain date specified in advance:

Tick ‘Deliver new items only’ if you want the bot to send you updates only:

14. Set up notifications.
Specify if you would like to receive a notification when the no code bot builder completes the crawl:

15. Start the bot!
Click the "Start this bot" button on the right-hand side:

That's it! You will be taken to your "Jobs" section. Your customizable bot is now working and will notify you once it's done.
Data output
After the bot constructor completes the job you can download your data as an Excel (XLSX), CSV or JSON file.