Getting the Most out of the Bulk Screenshot to Excel Converter
Published on July 24, 2023by BotsterToday, I want to show you how to convert screenshots to Excel files without stress.
In case you didn’t know, there are a number of reasons why you may need to convert a screenshot into Excel:
- Data Sharing: Excel files are a widely recognized and supported data-sharing format. By converting a screenshot into Excel, you can easily share the data with others, whether it's for collaborative purposes, reporting, or presentation.
- Data Storage: Screenshots may not be the most efficient or organized way to store data in the long term. But by converting them into Excel files, you can store and manage the data in a structured format that is searchable, sortable, and easily accessible.
- Data Extraction: Screenshots may contain tabular data, such as tables or lists, which can be more easily manipulated and analyzed in Excel. But when you know how to insert a screenshot in Excel, you will be able to extract the data and work with it in a structured and organized format.
So in this article, you will learn:
- How to take bulk screenshots of any website out there
- How to convert screenshots to Excel; and
- How to use bots to automate the whole process so you don’t have to spend too much time doing it.
I have a feeling this is going to be so much fun. So grab a drink, sit tight, and let’s get things moving!
Quickly, before we get into the nitty gritty of taking hundreds of screenshots at one go and putting them through the screenshot to Excel converter, what are some cases where it may become necessary to make bulk screenshots using Excel?
- The first case is if you’re a website owner or administrator, and you need to audit your website to ensure that all your pages are displaying correctly. You can take a bulk screenshot of all your pages and then review them to identify issues such as missing images, broken links, formatting errors, etc.
- Secondly, if you’re an agency that designs websites, it's crucial to have a quick visual assessment of potential client websites when prospecting. You can get a snapshot of their overall design, branding, and content, which can serve as a reference for future communications.
- Lastly, the prevalence of different screen sizes and devices mandates that your website be responsive and displays correctly across various resolutions. You can then take bulk screenshots of different resolutions to check how your website pages appear on each one.
Now, I will walk you through the process of taking bulk screenshots and of how to convert a screenshot to Excel. We’ll be doing this in the example of Wise, the popular Fintech startup.
Like I said, this is gonna be fun. So let’s get started!

Viewing a screenshot in Excel: Shortcut on link export
First, I will be introducing the Bulk Website Screenshot Maker. Just as its name depicts, this is a bot that can capture screenshots in bulk for a list of websites, and give you a neatly arranged result.
This is the first tool we’ll be using in this tutorial on how to convert a screenshot into Excel because we need some screenshots that we can convert to Excel files.
The Bulk Website Screenshot Maker is a fast and simple tool that can be used for multiple business-related purposes, such as:
- Site audit
- Competitor analysis
- Visual check of websites for potential collaboration or outreach
- Checking if your website content is displayed correctly
- Checking how your site’s pages display on screens with different parameters
- And much more!
To gain access to this tool, you must first open a free account with Botster. It’s fast, easy, and a credit card is not required:
 Once you’ve registered your account and confirmed your email address, you can continue with this article to learn how to automate the process of converting screenshots in Excel.
- Launch the Bulk Website Screenshot Maker's start page by clicking on “Start Bot”:

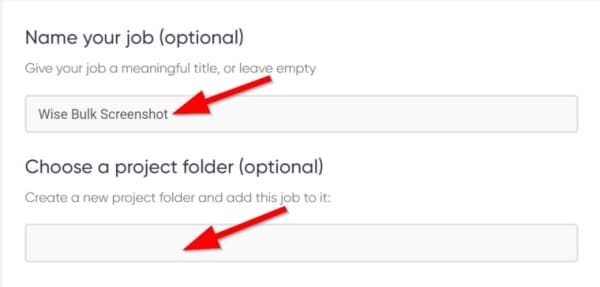
- Name your job and optionally specify a project folder:
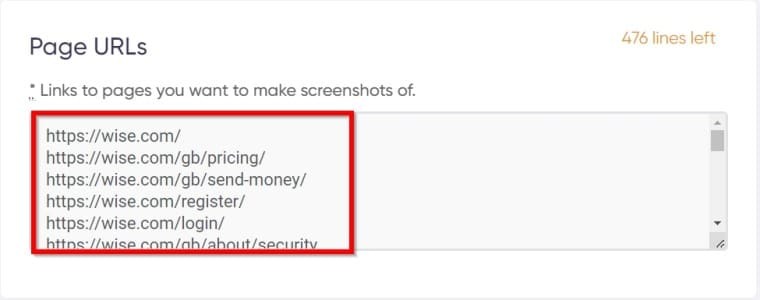
- Enter URLs.
Enter the URL of every page you wish to screenshot. Each one must be on a new line:
- Select the browser or device type.
Site layouts usually look different depending on various devices. The bot can grab screenshots as they appear on desktop, mobile, and tablet:

- Set up scheduling.
This may be helpful if you perform regular audits of a website à la automation:

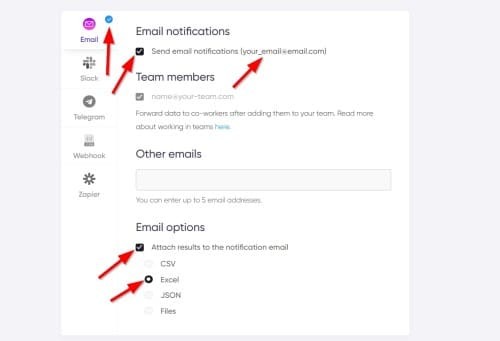
- Set up notifications.
Specify if you would like to receive a notification when the tool has finished taking the screenshots:
- Click on “Start This Bot” on the right-hand side to launch the bot into action:

Video guide
Watch me explain how to launch this bot in this easy-to-follow video:
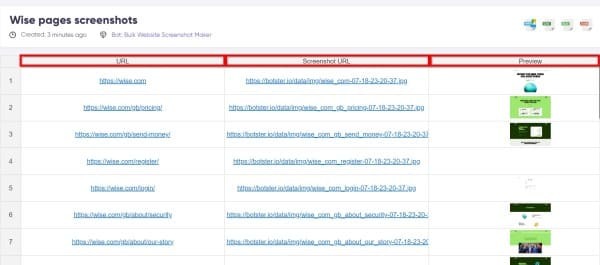
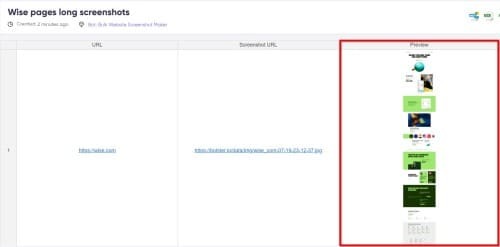
Results
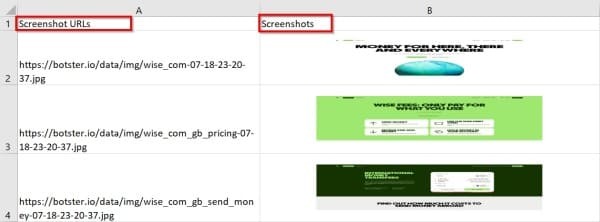
Within a few minutes, the bot will crawl all the pages you submitted and take a snapshot of each one. The result will look something like this:
Tips
Now we’ve successfully gotten a compilation of screenshot links and previews. Later on, we’ll use the data extracted here to form images.
For now though, here are tips that can help you make the most of what you’ve extracted:
- In our example, we made screenshots from the pages of a single website: Wise. However, if you made screenshots of different websites, ordering the data alphabetically may help you analyze the data easily and also identify duplicates.
- To convert those screenshots to Excel using our Excel screenshot shortcut, you must have Microsoft Excel installed on your laptop. If you don’t already have it, try getting a copy.
- If you’re an agency that does a bunch of outreach and would like to get the contact details of potential clients in bulk, my guide on creating a low-cost B2B sales lead database for your business is certainly a rich resource you can’t afford to miss.
Converting a LONG screenshot to Excel
Quickly, before we move on to the part I show you how to turn a screenshot into Excel, I’d like to draw your attention to a pesky little section I skipped in the process above.
You might have noticed that I skipped the section titled Page Rendering when I was showing you how to make bulk screenshots of websites:
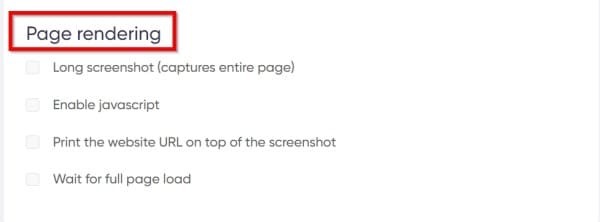 Well, fear not, for I intentionally skipped that part. The reason is so that I could give you a deeper look into what exactly that section can do for you. I will go through this one after the other:
- Long screenshot: while the method I described above will only capture the part of the page that appears on the screen, this function in particular lets you take a shot of the whole page.
- Enable Javascript: Javascript is a computer language that enables certain special features on websites. However, users can enable and disable Javascript in their browsers. Javascript is off by default in this bot, and this function lets you enable it.
- Print the website URL on top of the screenshot: when you activate this function, the URL of the page the bot captures will also be printed on it.
- Wait for full page load: While the bot can quickly capture pages even before they load fully, enabling this feature ensures that the bot waits until the pages are fully loaded before taking any screengrabs.
So assuming you activated the “Long Screenshot” and “Enable Javascript” functions:
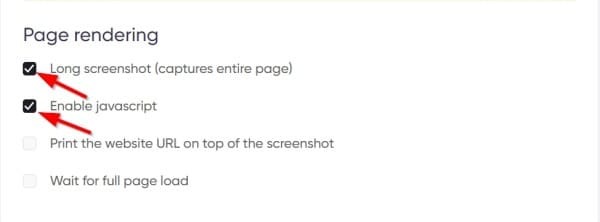 Your results will look more like this:
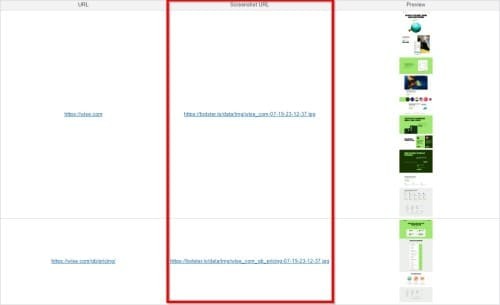
 That looks a lot better, right?
Yeah, it does.
So now that I’ve shown you everything about taking bulk screenshots of websites, let’s move on to the other business of the day — how to insert a screenshot into Excel.
How to add screenshots in Excel as images
You might be wondering why I went through the trouble of showing you how to take screenshots of entire website pages, i.e., long screenshots.
There are a number of reasons why you might need a larger screenshot in Excel. These include:
- Comprehensive Content: Full-page screenshots capture the entire web page's content, which can be important when sharing the entire page's appearance with others, especially for clients who need to review the overall design and how different elements interact.
- Documentation and Archiving: Full-page screenshots can serve as documentation and records for tracking changes and keeping historical records.
- Comparison and Analysis: Full-page screenshots facilitate easy comparison between different versions of a webpage or different pages altogether. For example, when A/B testing website layouts.
Now on how to insert a screenshot in an Excel cell, we will need the screenshot URL and the good ol’ Microsoft Excel:
- First, create a new sheet in Excel, so you have a blank slate to work with.
- Name your new sheet file so you don’t lose it in the pool of unnamed files you might already have:
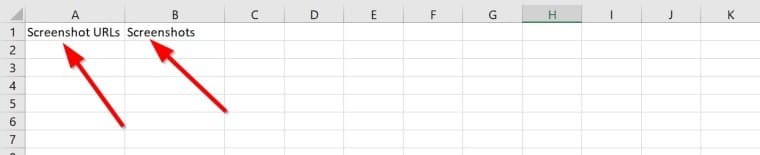
- Name your columns.
Here, we’d be having one column for URLs and another for screenshots:
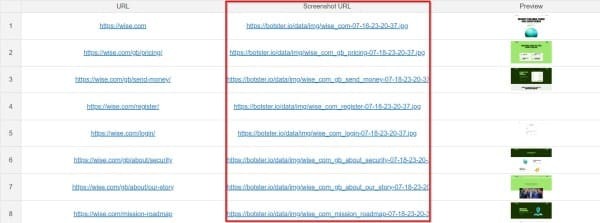
- Go to the results for the bulk screenshots we made earlier and copy the screenshot URLs:
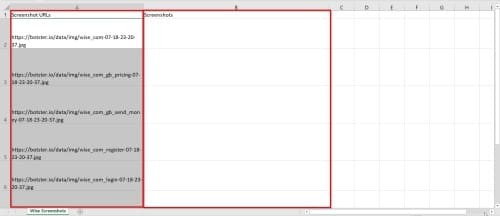
- Paste them into the appropriate column in your Excel file.
💡 Tip: Once you paste the URLs, you can either effect a text wrap or format your cells to autofit.
Now, here comes the fun part: adding a screenshot in Excel sheet from the URL using codes:
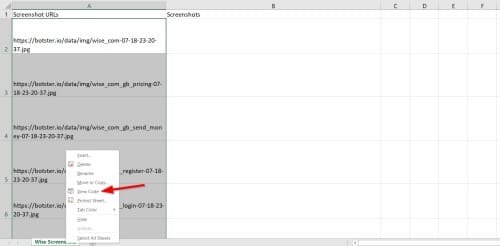
- Right-click on the name of your sheet at the bottom of the page and select View Code.
💡 Tip: Take note of the cell numbers of the first and last URLs. In my case, that’s A2 and A9:
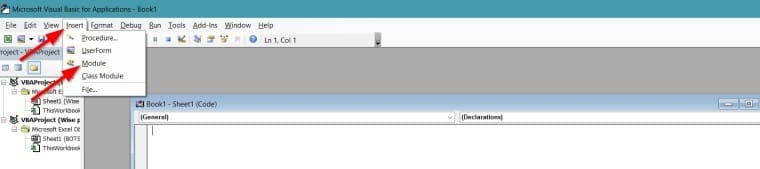
- In the window that opens, click on “Insert”, then “Module”:
- Now, copy and paste the code below into the box:
Sub URLPictureInsert()
'Updated By Botster
Dim Pshp As Shape
Dim xRg As Range
Dim xCol As Long
On Error Resume Next
Application.ScreenUpdating = False
Set Rng = ActiveSheet.Range("A2:A5")
For Each cell In Rng
filenam = cell
ActiveSheet.Pictures.Insert(filenam).Select
Set Pshp = Selection.ShapeRange.Item(1)
If Pshp Is Nothing Then GoTo lab
xCol = cell.Column + 1
Set xRg = Cells(cell.Row, xCol)
With Pshp
.LockAspectRatio = msoFalse
If .Width > xRg.Width Then .Width = xRg.Width * 2 / 3
If .Height > xRg.Height Then .Height = xRg.Height * 2 / 3
.Top = xRg.Top + (xRg.Height - .Height) / 2
.Left = xRg.Left + (xRg.Width - .Width) / 2
End With
lab:
Set Pshp = Nothing
Range("A2").Select
Next
Application.ScreenUpdating = True
End Sub
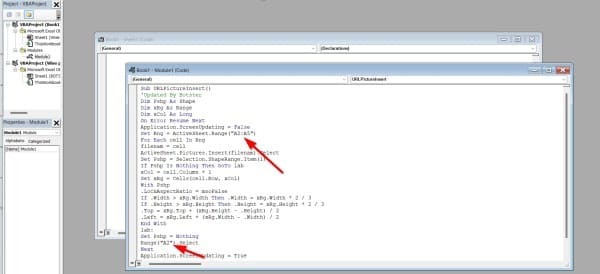
Note the two arrows in the image above. A2:A5 refers to the first and last columns I asked you to note earlier, while the second A2 refers to where you want your screenshots to start importing into. So, you must edit them accordingly. My URLs are in columns A2 through A9, and I want my screenshots to import into cells starting from B2; that’s right under “Screenshots”:

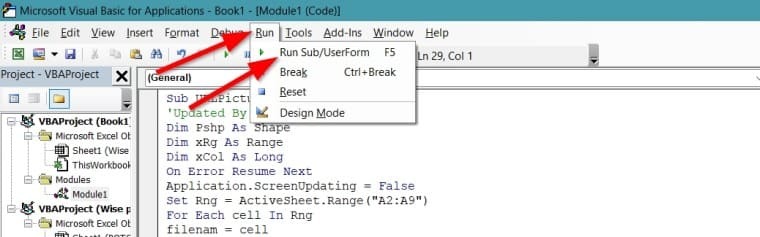
- Click on “Run” at the top of the window, then click on “Run Sub”:
- Open your Excel files and watch the screenshots get imported one after the other:
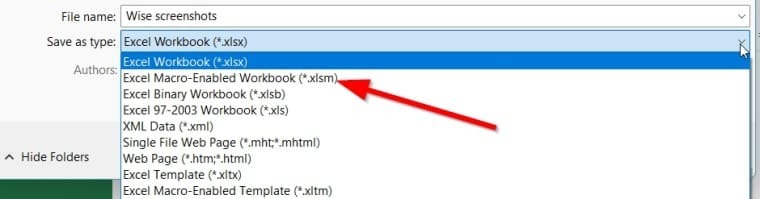
 Hold on a minute, we’re not done yet. We have to save the file as a macro-enabled workbook:
- Press CTRL + S.
- In the window that pops up, select Excel Macro-Enabled Workbook (*.xlsm):
 And that’s how to add screenshot in Excel sheet from URL in bulk!
But before I let you go, I have a quick tip for you.
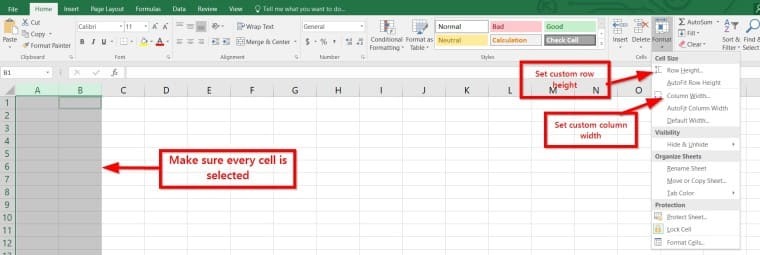
When trying to insert screenshot into Excel cell from a URL, the image’s size will depend on the size of the existing cells as it tries to conform.
Hence, it’s best that you adjust your column width and row height to help you get better images. You can easily do this by selecting columns A and B and setting fixed sizes for them immediately after creating the sheet file:
 When I fixed my row height to 150, column width to 8, and repeated the process, my result looked like this:
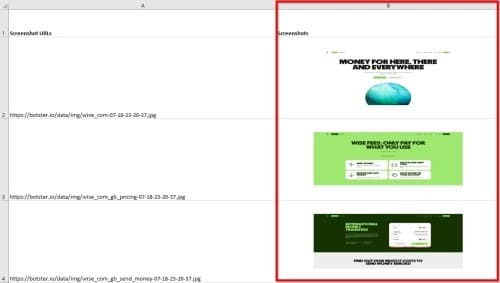 Much better right? You bet! Haha

Google Sheets: screenshot import
If you’re more familiar with Google Sheets rather than Excel, you can still insert a screenshot in Google Sheets using what’s called the Image Function.
The code format is =IMAGE(“URL”), where “URL” is the link to the image you wish to insert.
- Create a new spreadsheet file and select the cell you’d wish to have the image imported.
- Type =image in the cell to bring up the Image Function feature:
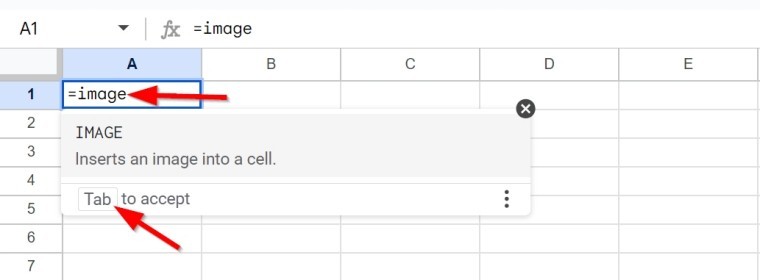
- Press the Tab button on your keyboard to accept the function, then open a quote, paste the image URL, close the quote, and close the bracket:
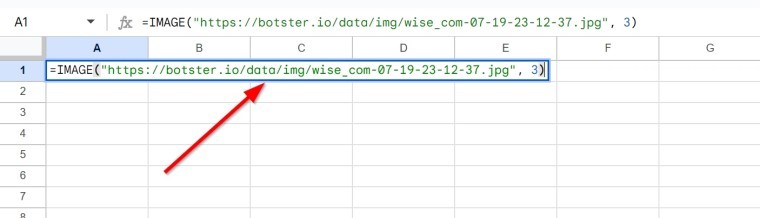
Note: the “3” in the parameter above means the Google Sheet screenshot should import at full size.
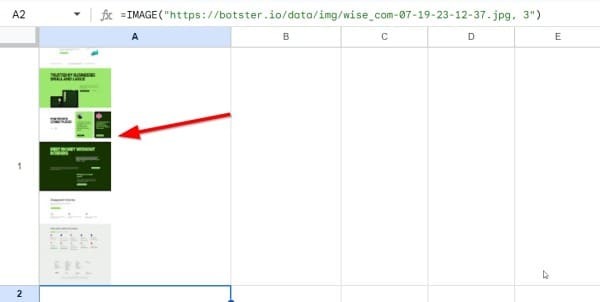
- Now press “Enter”, and the image will be imported:
 The full code looks like this:
=IMAGE("image URL", 3)
You can just copy and paste that into a Google Sheets cell, replacing the image URL with a link to the desired image.
With this method of how to add a screenshot in Google Sheet, though, you have to import each image one after the other. For long screenshots, you may also need to resize the cells to see the full image.
Turning a screenshot into Excel: Pricing
All along, you’ve probably been wondering: How much is the Bulk Website Screenshot Maker?
Well, I love to break it to you that it costs very little to use it in grabbing bulk screenshots of several websites at once: the Bulk Website Screenshot Maker costs just $3 to make screengrabs of 100 URLs.
And for the code that lets you bulk-insert screenshot in Excel cell from URLs, that is absolutely free. You only need to have Microsoft Excel installed and working on your laptop.
Few tasks are as boring and monotonous as visiting 500 URLs and screen-grabbing them one after the other. Even fewer are those that are as exhausting as importing those 500 images into Excel cells.
So why not save yourself energy and time by using the Bulk Website Screenshot Maker and our Excel screenshot shortcut to make it faster? Start by opening a Botster account today to claim your free trial!

Read more of our blogs