How to Export Shopify Store Inventory to Excel: A Guide for Non-Coders
Published on May 22, 2024by BotsterAre you looking for fast, easy, and non-technical ways to export Shopify store product data? You’re in luck! In this comprehensive guide, I will show you how to scrape Shopify stores step by step leveraging the Shopify product API and a few automation bots.
How is this possible?
This is possible through the in-built Shopify inventory API. Every Shopify store has a built-in public API that allows you to access structured product data of any store built on Shopify. However, this trick may not work on a few Shopify stores that have been customized so much that the API has been disabled.
Anyway, knowing how to scrape Shopify stores from the Shopify products API can do wonders for your e-commerce business and is also a cool thing to brag about.
And did I mention that you don’t need to know anything about programming to be able to do these things? No. You don’t even need your college to do this. All you have to do is follow me closely as I walk you through these steps, and we’ll export Shopify collections easily within minutes!
As I've already mentioned, I’m going to describe several automation tools that will help you perform Shopify inventory export with just a little effort on your end.
From this step-by-step guide, you’ll learn how to:
- Export Shopify store products with collections
- Extract Shopify products with images
- Monitor Shopify store product prices on automation
- Export inventory Shopify store data
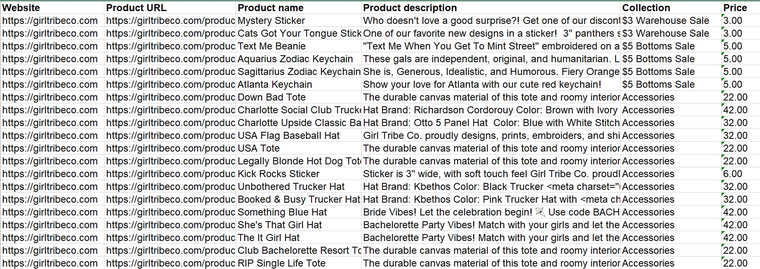
By the end of this guide, you'll be able to make up a detailed database of any Shopify store inventory like the one below:
 The best part of this tutorial on how to export inventory from Shopify is that you need not have any knowledge of coding, programming, or anything like that.
You don't need a background in computer science. Heck, you don't even need to know how Shopify's system works or what goes on in the background. All you have to do is follow me closely, and you'll be ready to export collection Shopify products in no time.
To put this guide in perspective, I'll select a random Shopify fashion store for our case study. I'll suggest you do the same for your niche and follow as we proceed. You don't need to pick a fashion store if that's not your niche. If the store is built on Shopify, this strategy will work, no matter the branch.
If you're not sure whether the store is built on Shopify or not, you can check it using BuiltWith. BuiltWith is a service that lets you find out the tech behind any website. If a store is not built with Shopify, it won't have the Shopify collection API, so you have to be sure.
Just visit BuiltWith, enter the website URL and press enter. On the next page, scroll down to the section titled 'E-commerce'. If it's Shopify, then you can proceed with the steps below.
How to use the Shopify products API for scraping inventory
Shopify: Export store product information manually
There are two ways by which you can check a store built on Shopify, export collections, and download the data to your computer: the manual way and the automated way.
The manual method is quite as effective as the automated method. However, you'll spend more time collecting the data and exporting it to Excel. ⏰
Here's how to export Shopify store product information manually:
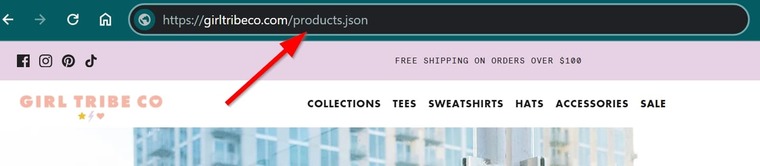
- Open your browser and navigate to a Shopify store:
- On the store's homepage, edit the URL in the address bar and append "/products.json" to it:
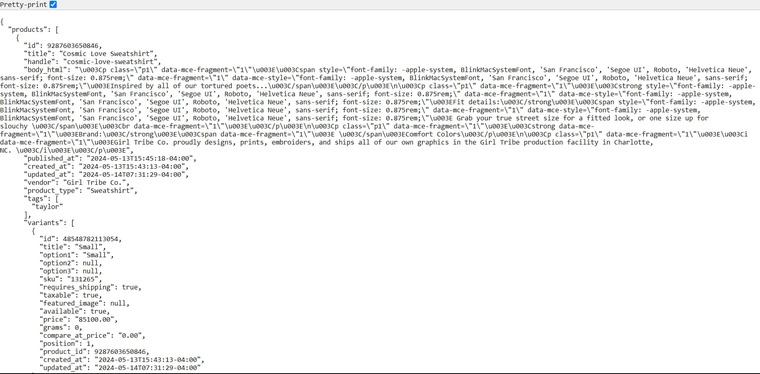
- Press "Enter" and you will instantly access a gold mine of structured product data:
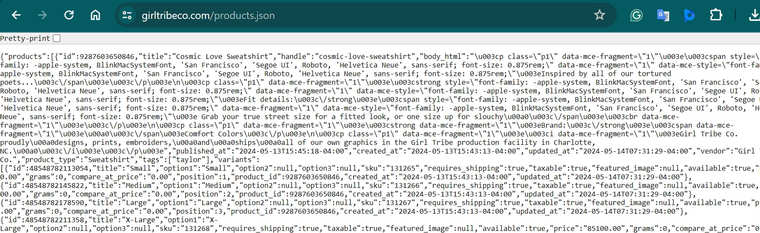
- Install the Chrome JSON Viewer extension to automatically make the data readable. If your browser brings “pretty print” like mine, just tick it. Either way, it should look like this:
- Create a new spreadsheet file and manually extract the data from Chrome into Excel.
Note that while the API feature is standard in Shopify, some heavily customized stores may have it turned off. In a case like this, you can build a custom data scraper using the No-Code Bot Builder (but this is yet another story that I’m going to tell you a bit later. Follow my blog if you don’t want to miss it!).
Shopify: Export products with collections
If you take the manual route described above, you’ll quickly find out that extracting hundreds of product data will cost you several boring hours going between your browser and Excel. 🥱
Now, imagine that you need to export these product information data from 10 different stores.
A much better and sustainable way would be to leverage automation bots that can bulk export Shopify collections within just a minute or less 🚀 A perfect tool to use in this case is none other than the Shopify Product Scraper.
The Shopify Product Scraper is an automation tool that can leverage the Shopify API product data to scrape product information from any Shopify store. It extracts several details about these products, including their names, collections, descriptions, and categories, among other data.
It can export data from any e-commerce store that is built on Shopify. It will also extract the list into a spreadsheet for offline analysis in Excel.
To launch this Shopify store scraper, all you need is the URL to the store’s homepage, and you can extract as many products as you want!
To gain access to the Shopify Product Scraper, you must first create a free account on Botster:
 Registration is totally free, and your credit card details are not even required. Upon completing your registration, you’ll gain access to a plethora of other automation tools as well.
Once you’ve confirmed your email address, proceed with the steps below to export any Shopify store products:
- Open the Shopify Product Scraper’s page by clicking on “Start Bot”:

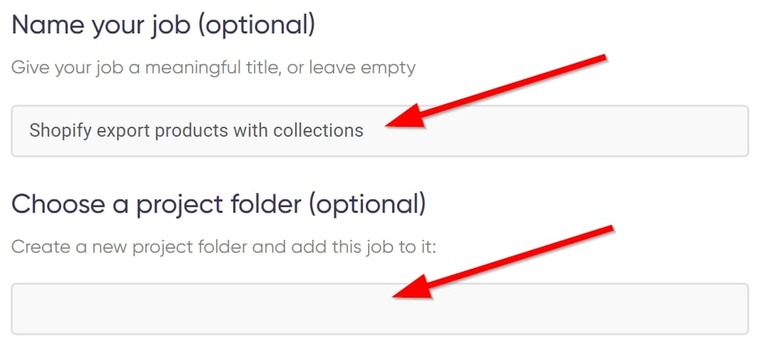
- Give your job a unique name and specify a project folder if you wish. I named my job “Shopify export products with collections”:
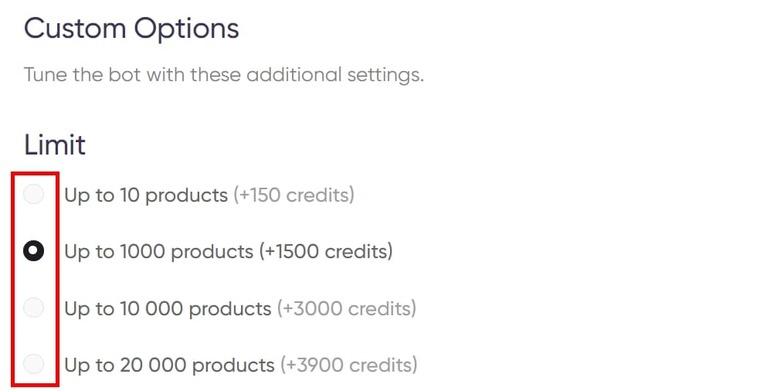
- Set the maximum number of products you want the software to extract for you:
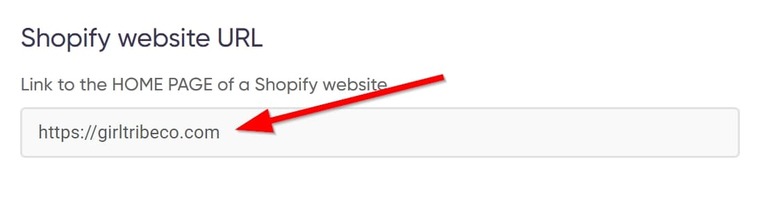
- Now, enter the URL of the Shopify store you want to extract data from. Typically, this should be a competing store in the same niche as you:
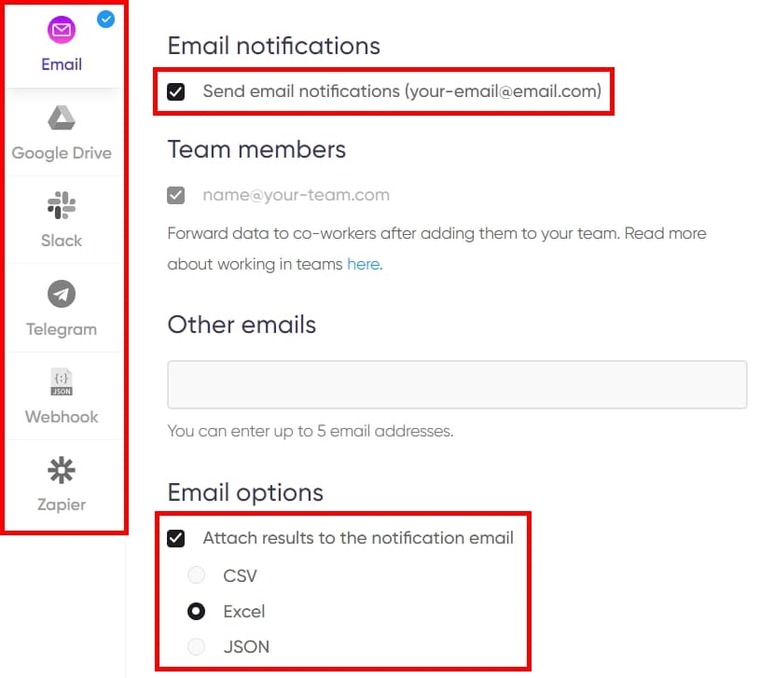
- Set your notification options and how you’d like to receive the file:
- Finally, click on “Start this bot” and voila! You’re done. Easy peasy.
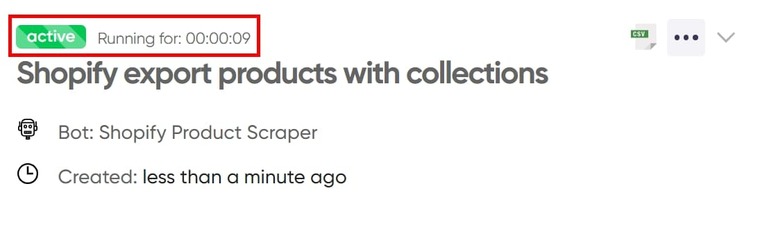
 The “My Jobs” page will launch automatically, and you can see the bot running to fetch the data you requested:
 Just wait a few seconds to be able to download the results to your computer.
Video guide
Meanwhile, if you’d rather watch a video of how to use this automation tool to scrape Shopify stores, here’s one I made earlier solely for that purpose:
Results
In less than a minute, the software will compile your results and you’ll see something like this:
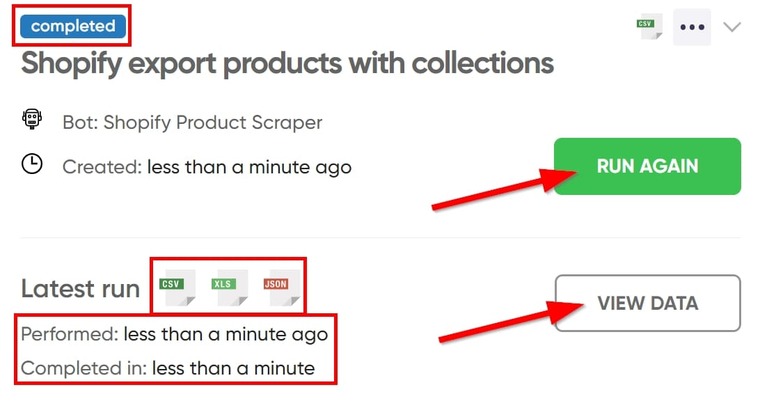 From here, you can view the data immediately or run again after some weeks to get updated results. You can also click on CSV, XLS, or JSON to download the file in that particular format.
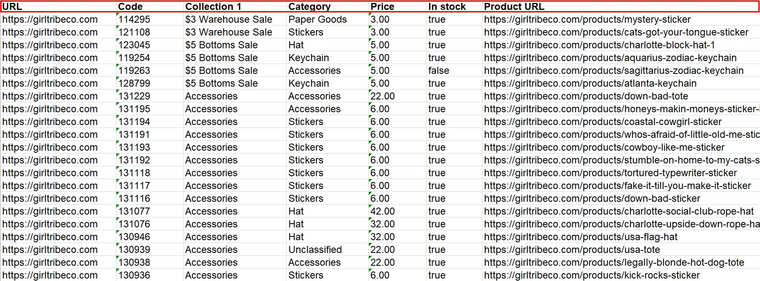
If you open the file in Excel, it’ll look like this:
Tips
- If you have similar products with the extracted store, you can easily compare your pricing to see how you match up.
- I’ll recommend analyzing their collections and also organizing your inventory to make it easier to browse.
- Also, read my comprehensive guide on finding the most profitable products to sell on Shopify.
Shopify: Export products with images
If you’re looking to export product images from Shopify, there’s a way to go about that too. This involves some geek stuff, but I bet anyone can pull it off!
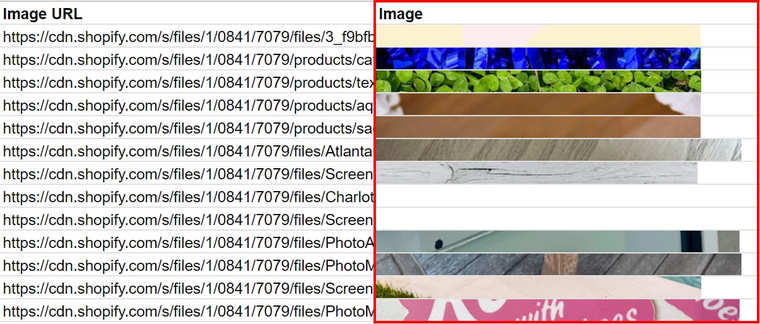
If you look through the results you downloaded from the Shopify Product Scraper, you will notice a column titled “Image URL”:
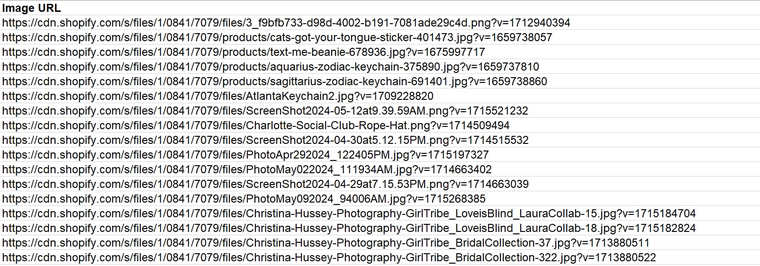 Using these image URLs, you can easily export product images from Shopify stores into Google Sheets using what’s called an "Image Function".
The code format is =IMAGE(“URL”), where “URL” is the link to the image you wish to export.
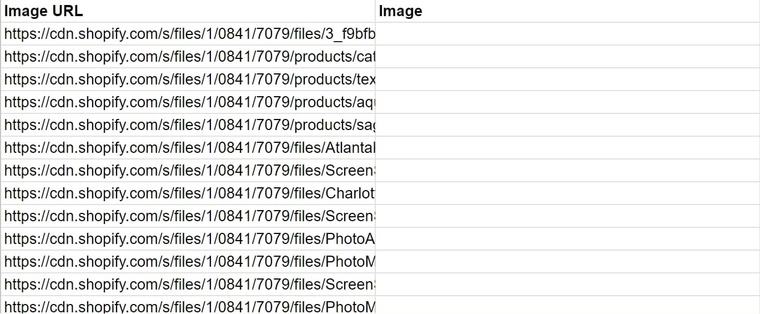
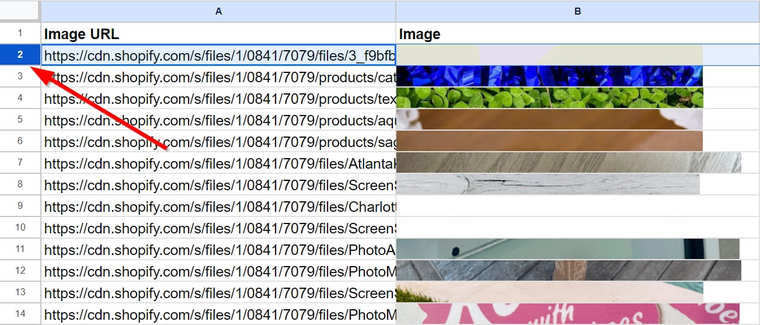
- Create a new spreadsheet in Google Sheets and paste the extracted image URLs into it:
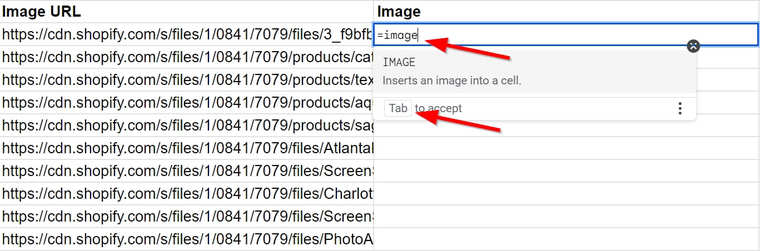
- Select an empty cell in column “Image” and type =image in the cell to bring up the Image Function feature:
- Press the Tab button on your keyboard to accept the function, then open a quote, and paste the corresponding image URL from the column “Image URLs”, followed by a comma and the number 3. Close the quote, and close the bracket:
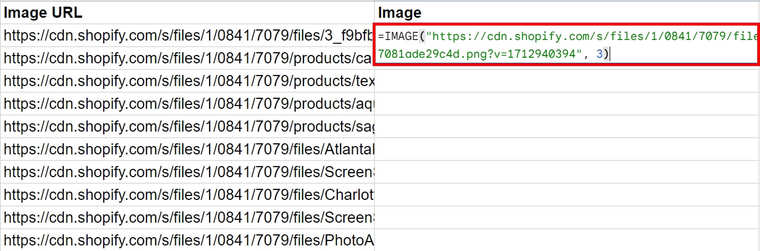
Note: the “3” in the parameter above means that Google Sheets should import the images at full size.
- Now press “Enter”, and the image will be imported. Repeat for every image URL in your spreadsheet:
The full code looks like this: =IMAGE("image URL", 3).
You can just copy and paste that into a Google Sheets cell, replacing the image URL with a link to the desired image.
To see the full image, you just need to resize the cells. Here’s how:
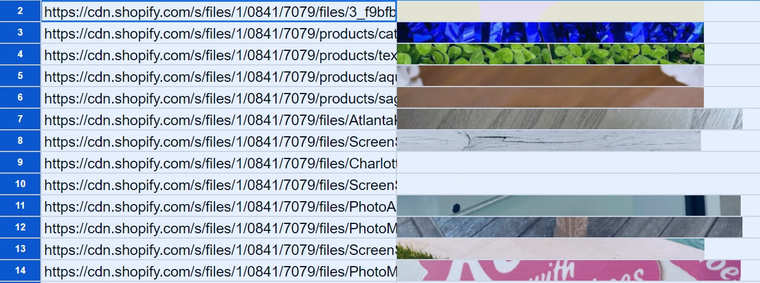
- Click on the label of row 2 to select the entire row:
- Press Ctrl, Shift, and Down Arrow (Windows) or Cmd ⌘, Shift, and Down Arrow (MAC) to select all available rows:
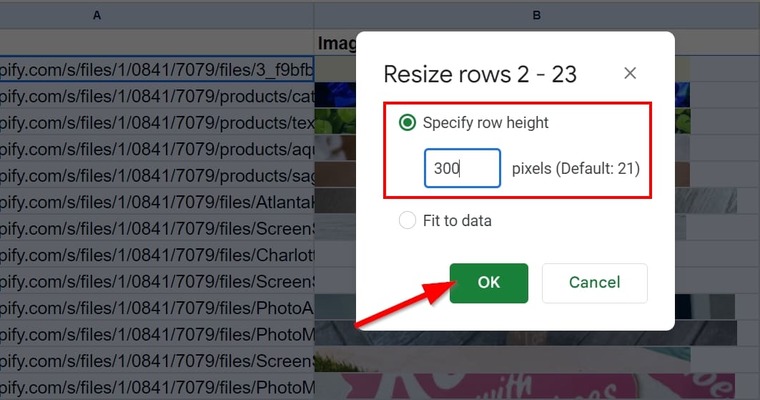
- Right-click anywhere in the sheet and a menu will appear. Select Resize rows n-n:
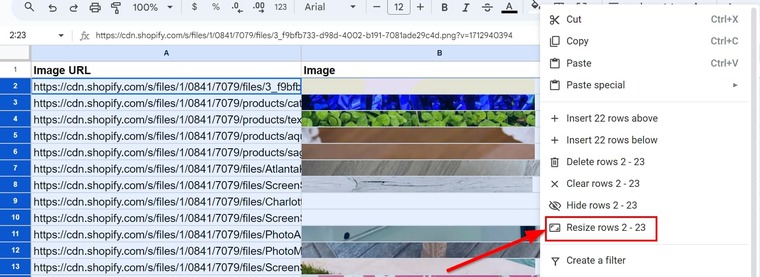
- Select “Specify row height” and enter a value. I’ll enter 300:
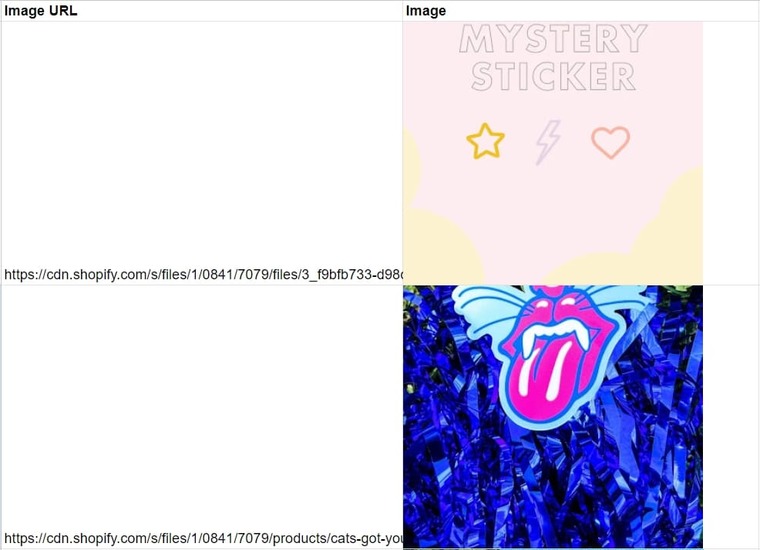
 You should have something similar to this:
 If you would like to export collections’ Shopify images to Excel, read my article on how to convert a screenshot to Excel for the full guide.
Shopify: Monitor product prices
Now that you have a database of products from your competitor’s Shopify store, there are several things you can do. One of those things is putting a tracker on their product prices to monitor changes.
You’ve already learned how to export collections from Shopify using the Shopify Product Scraper, but that won’t do anything for price tracking. To effectively track Shopify store product prices, use the Shopify Product Price Monitor.
The Shopify Product Price Monitor can be seen as a Shopify export sales report tool, but since you can’t access their sales data in any way, you can always keep an eye on price changes.
This bot monitors the price of a specific product in a Shopify store and sends you notifications when pricing changes happen. It’s great for competitor price monitoring, or tracking an item's price in a Shopify store for purchasing it later.
You can easily launch the Shopify Product Price Monitor by following the steps below:
- Open the Shopify Product Price Monitor's start page and name your job.
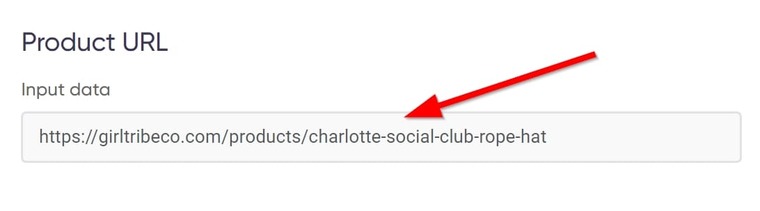
- Paste the URL to the product you’d like to monitor:
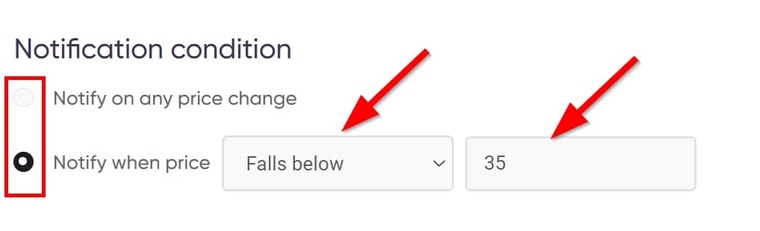
- Set notification conditions. The product I’m using currently costs $42, and I want a notification when it goes below $35:
- Set how often and what time the bot should run:
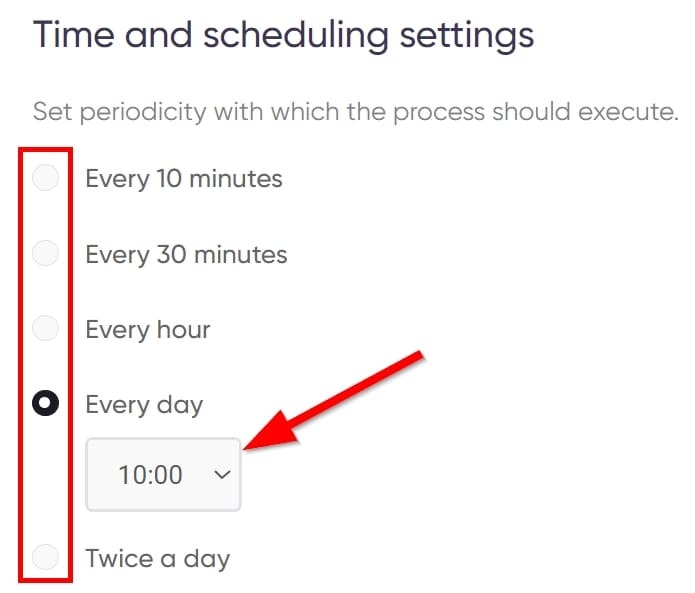
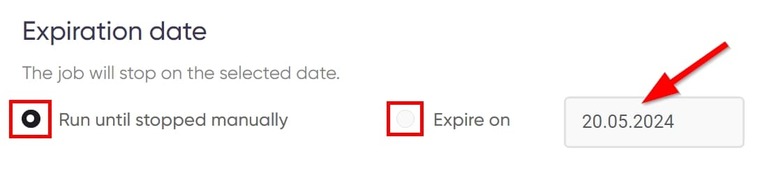
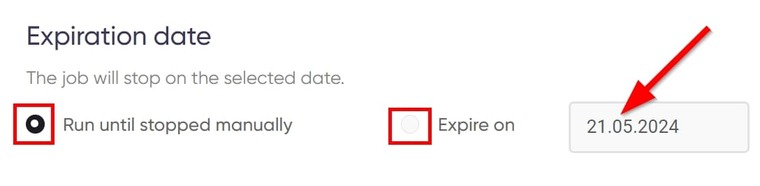
- You can set an expiration date or let the bot keep running until you stop it:
- Now, start the bot.
Video guide
Here’s a short video describing how to monitor Shopify product prices:
Results
Unlike the previous bot, the Shopify Product Price Monitor doesn’t pack data into a spreadsheet. Rather, it sends emails of the results on each run based on the preferences you selected during the setup.
Tips
- Monitoring competitors’ product prices can help you gauge the demand for a product you plan to sell in your store. A bump in prices may indicate high demand while a fall in prices may indicate low demand.
- It also helps you price your inventory currently without leaving money on the table, being within the same price range as other sellers.
- Also, if you are in search of B2B clients or partners for your Shopify store, consider creating a low-cost B2B lead generation database using automation tools.
Shopify: Export inventory and track changes
Now there’s one last thing you must be able to extract from your competitors’ Shopify stores and that’s their inventory.
We’ve already covered how to export collection from Shopify, but that’s different from inventory tracking.
When you export collections, you get a list of the products in their database. But with inventory tracking, you get notified every time a new product appears in the store or an old one disappears.
To track a Shopify store’s inventory on autopilot, use the Shopify Product Inventory Tracker.
The Shopify Product Inventory Tracker will regularly scan a Shopify store URL you provide and send you notifications when products appear or disappear from the store.
In case you were wondering, you can’t export Shopify inventory CSV files. What you’ll get is a monitoring report in your email inbox.
Here’s how to set up the Shopify Product Inventory Tracker to monitor inventory changes:
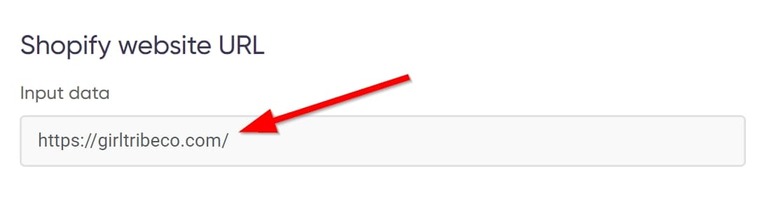
- Open the bot’s start page and enter a Shopify store URL:
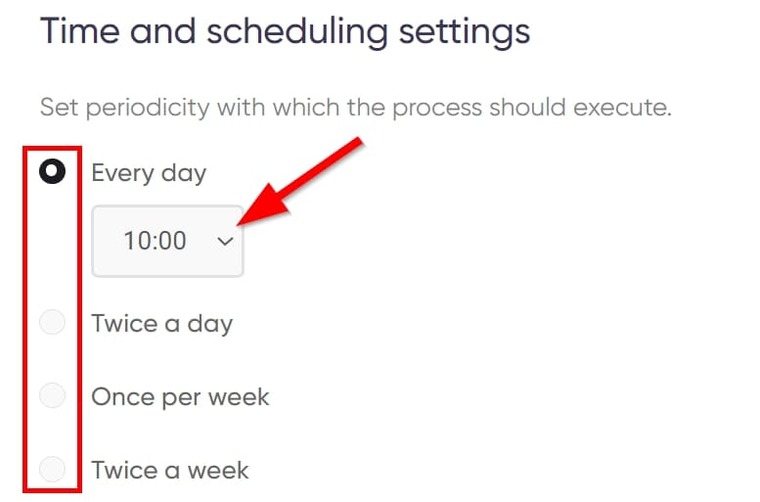
- Set up time and scheduling for the bot run:
- Set an expiration date:
- Start the bot and that’s it!
Now, you only need to keep checking your email for the monitoring status.
Same as it is for the previous bot, expect notifications in your email.
Video tutorial
Watch a quick guide on how to use the Shopify Product Inventory Tracker:
Tips
- I recommend tracking inventory for 3 reasons: to help you stay competitive, to give you price insights, and to give you industry insights.
- Read my guide on the best Shopify automation tools that can help grow your Shopify store.
Free trial for the Shopify store scraper tools
Seeing as I just showed 3 different Shopify automation tools, you’re probably worried about how much it will cost to access and use them. Well, you should know that you can export Shopify collections manually if you put your heart and time into it.
The problem is that you won’t be able to scale your business faster. These tools, however, cost too little to worry about.
Putting their cost aside, you can gain full access to these tools for the next 7 days just by creating a free Botster account in under 2 minutes. And even when the trial period is over, they cost so little you’d barely know you’ve spent a dime.
Combined, these tools cost only a fraction of Shopify Basic's monthly subscription fee, yet their benefits are way enormous.
There’s no reason to pass up this opportunity to spy on your competitors using the power of the Shopify product API. Open a Botster account today and get started right away!

Read more of our blogs